Tuesday, March 19, 2013

Grilled Pineapple, Cashew and Quinoa Stir-Fry/Salad

A friend of mine recently made this for me and I was blown away. It can be eaten warm, at room temperature or cold.
 
I googled "grilled pineapple and quinoa" and found this 3 down. It's written like it was their original invention, which is totally awesome because I think it's genius. Fried rice, without the rice! I modified the vegetables, purely because of what I had in the fridge. Also in the original recipe they fry the onion in sesame oil, which I think is a mistake because it loses its sesame aroma quickly at high heat.

Grilled Pineapple, Cashew and Quinoa Stir-Fry/Salad

 
1 cup quinoa
1 zucchini
1 carrot
3 spring onions
1/2 cup unsalted roasted cashews
1 onion finely diced
5 cm knob ginger finely diced
3-5 cloves garlic finely diced
1 pineapple
3 eggs
1 lime
1/2 cup peas
sesame oil
soy sauce

 
Place 1 cup quinoa with 2 cups water, bring to boil and simmer 12 minutes, drain and set aside.
 
 
While the quinoa is cooking, finely dice up the vegetables and get started on your pineapple. Cut into 1.5cm thick discs and remove skin.

 
This one was super sweet, hello Sunshine Coast!

 
The Pineapple grilled really well on the baby Q weber, 3-4 minutes on each side on a low heat.
 
It also works well in a flat sandwich press.

 
Dice up your grilled pineapple, I wish I'd cut mine up finer because I wanted pineapple in every bite.
 

Add the onion to a pan or wok with 1 tbl vegetable oil.
 
 
Cook for 3-5 minutes until it starts to caramelise.
 
 
Add the carrot, fry for 2-3 minutes 

 
Add frozen peas, cook another minute or so

 
Add finely diced zucchini, fry another minute

 
Add white and some of the green parts of the spring onion (keep a little if the green tips for a garnish). Fry another minute.

 
And the cooked quinoa, a generous splash of sesame oil and soy sauce
 
 
Add cashews and grilled pineapple pieces, warm through
 
 
Quickly cook your omelette, with 3 eggs beaten well with 1-2 tbl water
 

 Roughly chop and stir through.
 
 
Add the green of the spring onion and a squeeze of lime to garnish. 
 
 
 The cashew, egg and grilled pineapple combo is so yummy. More cashews I say!
 
Enjoy!
 

Saturday, March 16, 2013

Where Did Your Corn Grow?

It's no secret that Woolworths and Coles together hold a duopoly over the Australian Grocery market. Whether you are discussing the wine market, the devastating effect it is currently having on our dairy farmers, or the consequences of their sheer market power due to their ~80% share, it's all bad news.

Except of course for you the consumer, you get a great deal, in fact it's a steal. Because your savings are coming straight out of the pockets of our local farmers and if we don't start taking care of them, pretty soon we won't have any. Not to mention the true cost to the environment doing crazy things like transporting oranges from California to Australia aren't even considered in the monetary equation.

What's the solution? Farmers markets are becoming more and more popular, which is great, but they are typically only on once a week, with a 3-6 hour window.

On my recent 6500 km drive across Australia, I stayed a few days with my sister in Canberra. Her local shops contained one of the coolest shops I've ever visited! Choku Bai Jo sells produce from local farmers. The goal for the shop was to give farmers another outlet for their fresh produce making it easier for the public to access it.


What a great idea!
 
 
The farmers name, growing region and distance from Canberra are listed whenever possible.
 
 
In case you can't read the blue sign in this photo it says
 
 EVERYTHING WITH A COLOURED LABEL
IS FROM A LOCAL GROWER WE KNOW AND TRUST.
 
I don't expect supermarkets to do this, they operate with such big volumes. These days woolies have maps with little green dots of growing regions, but you don't know WHERE exactly your particular cucumber came from in this wide land of ours.
 
 
My sister grabbing some grapes.

The corn in this photo was from Mona Park in Queensland, some 2215 km from Canberra. I don't think even Australians appreciate the true expanse of our country. It makes the argument for buying locally grown tricky. But shouldn't we be making an informed choice regardless?

Its a complicated problem, with no simple solution, but I know every carrot you buy at a farmers market is a win for local growers. Support them!

 
Buy local honey!
 
 
.... blue signs all round, would you care for some local cabbage?
 

Friday, March 15, 2013

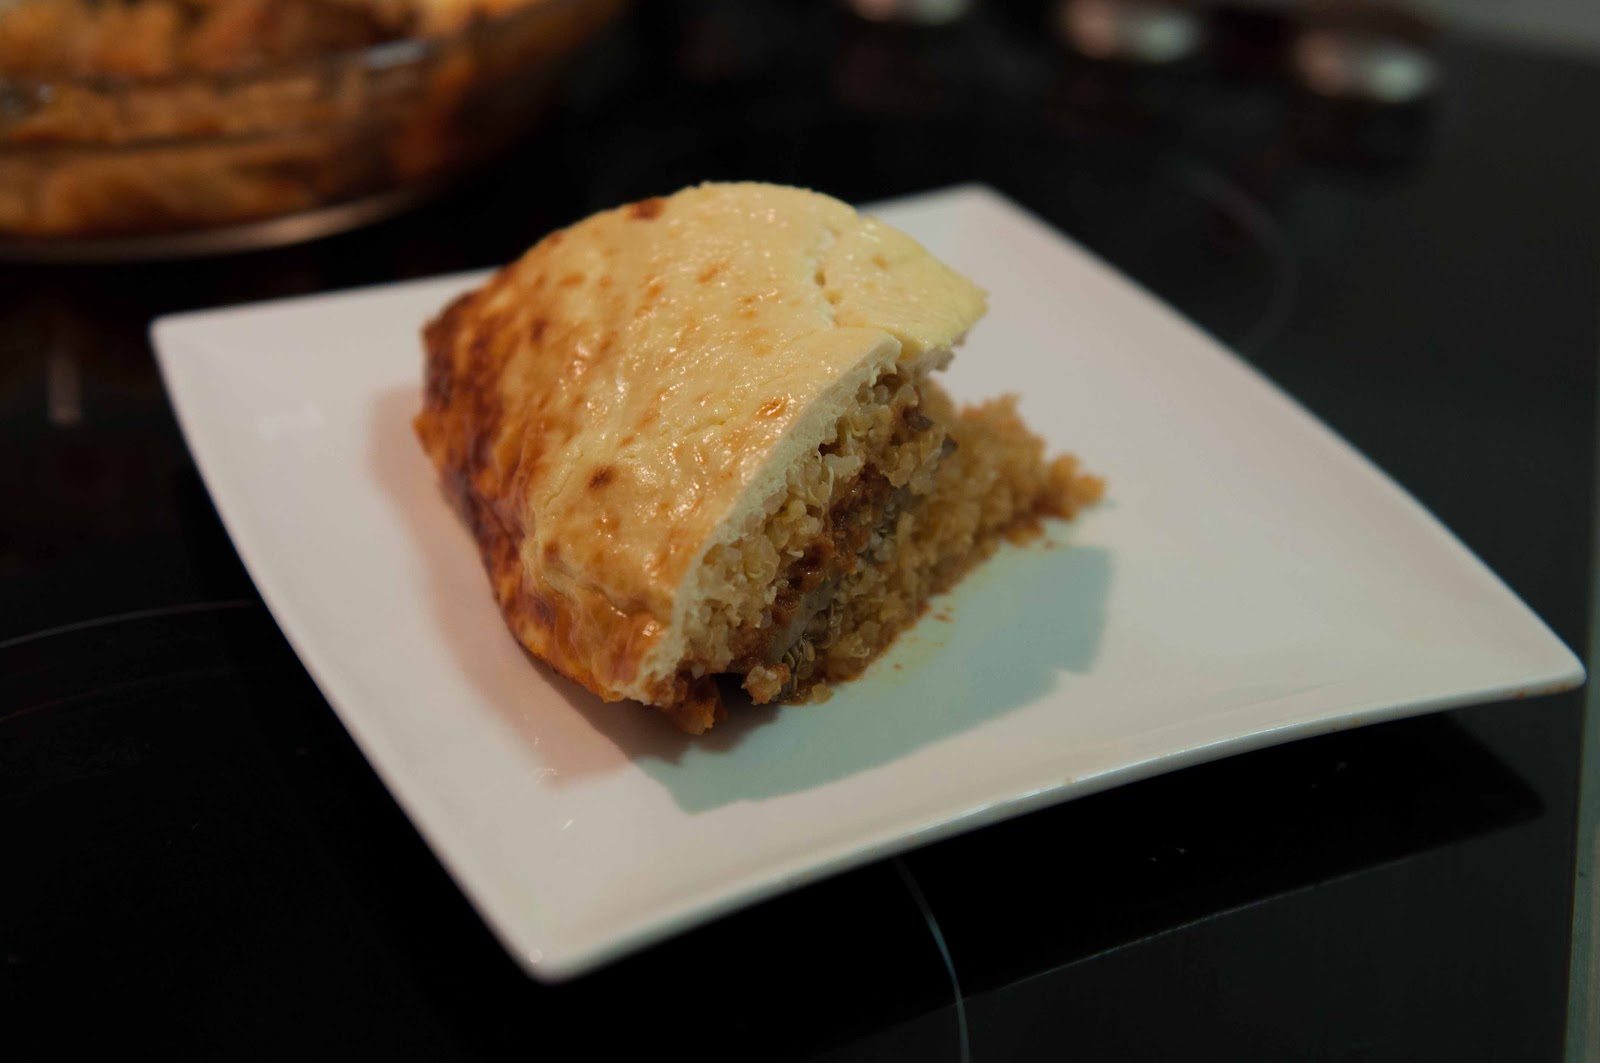
Martha Rose's Eggplant, Quinoa and Tomato Casserole with Yogurt Topping

This is another winner recipe from Martha Rose Shulmans, Recipes For Health. This woman is my hero! It's vegetarian moussaka and oh so yummy! Light, but hearty at the same time.
 
I followed the recipe closely, except i replaced bulgur with quinoa (making it GF), I prepared my eggplant slightly differently and I used whole cinnamon and smoked paprika.
 
I've never made this yogurt-egg topping before, apparently it's "Balkan-style". Not only is it far more convenient than making a white sauce, but also lighter and healthier.
 
Eggplant, Quinoa and Tomato Casserole with Yogurt Topping

 
Tomato Sauce       
Olive oil       
1 large onion
4-8 garlic cloves
2 (425gm) tins of tomatoes      
Salt and pepper
1/2 - 1 & 1/2 teaspoon sugar (taste to adjust)
2 cinnamon sticks
1 tsp smoked paprika
1/2 tsp allspice
     
Filling
3 small or 1 large eggplant
3/4 cup dried quinoa 
4 tbl Parmesan    

Topping 
3 eggs
1 cup thick Greek yogurt (I think full fat is important here)
Salt, pepper and paprika to taste
2 tbl freshly grated Parmesan

Preheat your oven to 220 degrees C.

 
Dice the onion and garlic. Don't worry about it being too fine as you blend it once the sauce is finished.
 
 
Start fry the onion on a medium heat.
 
 
Once the onions are nice and caramelised (5-8 minutes), add the garlic and cinnamon.
 
 
 Fry for another minute or so then add the all spice and paprika.

 
I found some smoked paprika, its yum!

 
Add the tomatoes, sugar, salt and pepper and let it simmer for about 30-40 minutes.

 
Keep an eye on the sauce while preparing the eggplant and quinoa.
 
 
Slice the eggplant into 1cm thick discs.
 
 
Lightly salt and oil the eggplant then place in oven for 30 minutes, turning them over at the 15 minute mark. Don't over cook them because they will become too sloppy in the casserole.
 

I haven't mastered cooking quinoa by evaporation, so I put 3/4 cup with about 2 cups of water and boiled it for about 10 minutes. Slightly under cook it as it continues to cook in the casserole.

 
Once the quinoa is done, drain and set aside.
 
 
Mix up the yogurt topping.
 
 
After the tomato sauce has simmered for 30-40 minutes, grab your hand held blender and make it nice and smooth.
 
 
Taste for sugar, salt and pepper.
  
 
Once the eggplant is done, turn your oven down to 180 and put the casserole together.


 A thin layer of tomato on the base.


Add about 1/2 the quinoa.


Make a nice snug layer of eggplant
 
 
Add another layer of tomato and a sprinkle of parmesan cheese.


The rest of the quinoa 
 

The yogurt sauce and another sprinkle of cheese.


Bake at 180 for 30-40 minutes until brown on top.


Be very careful not to over cook it. Baked dishes with yogurt or ricotta can curdle if you cook them too long.


 Enjoy!

Monday, March 4, 2013

Azuki Bean Smoothie

I'm so excited about my latest breakfast smoothie; it's almost chocolatey and down right delicious! 
 
I've ventured into the world of the azuki beans for a couple of reasons.
 
 
I've always loved them in Asian desserts as sweetened red bean paste and I've been meaning to experiment with  them.
 
They are a legume, therefore great for you.
 
Introducing another legume to my repertoire = more variety.

My main driver, however, was my back. Azuki beans (also known as adzuki and aduki beans) are identified as a special bean for draining dampness in the body. "Dampness" is a term used in traditional Chinese medicine. I recently started getting acupuncture for my back issues (that I've had for years) and was told the excess "dampness" in my body was a strong contributor to my aches and pains.
 
I'm always sceptical of this kind of talk, but after just two acupuncture sessions, there has been a noticeable improvement. So I'm will to try anything (except supplements).
 
It takes a little planning and preparation the day before, when you soak and cook the beans, but the cooked beans will last 3-4 days in the fridge and you can even freeze them if you like.
 
Soak 1 cup of beans in plenty of cold water for 6-8 hours. This will make about 4, 1/2 cup serves of cooked beans.

 
Place your soaked beans in a saucepan on the stove and bring to a simmer for about 5-10 minutes, until foam develops on the surface of the water.
 
Strain the beans, discarding the cooking water, rinse off the foam and clean out the saucepan (all website recipes I looked at include this step and I can't find an explanation why).
 
Add 2-3 cups of cold water to the beans and bring back to a simmer for 1 to 1 & 1/2 hours, until they are soft enough to break with your tongue.
 
While boiling, keep the temperature low because if they boil to rapidly they tend to break up a little.
 
When they are done, strain and put in the fridge to chill.

Azuki Smoothie
 
 
1/2 cup chilled, cooked azuki beans
1/2 cup unsweetened natural yogurt
1/2 cup almond milk (rice, oat, dairy milks are also fine)
1 banana (mango works well too)
A generous spoonful of honey or sweetener of your choice.

The beans require a fair amount of added sweetness. The exact amount will depend a lot on the natural sweetness of your fruit and milk choice (the almond milk I used is not very sweet), you can always add more honey.

 
I used a hand blender, it takes a couple of minutes to break down the beans and make it nice and smooth.
 
 
I really hope you enjoy it!


Sunday, March 3, 2013

Pre-mix Orgran Buckwheat Pancakes

I'm a little hesitant to consume abundant quantities of the GF flours and baked goods you find these days. They are typically composed of highly refined rice, potato and tapioca flours/starches, not to mention a bunch of numbers.

I don't desire a product that pretends to be white flour. Instead I'm on the hunt for ways to use things like buckwheat flour, polenta or oats in baking, where we celebrate them, not attempt to hide them.

In truth I have started experimenting, with varied success. I'm not too good at following recipes, perhaps this is a case where I'm going to have to start.

This whole preamble is basically me trying to justify writing a post about using a premix. I'm not a premix kind of girl, but due to my recent spate of GF baking failures I wanted a win. There are many great GF blogs with heaps of recipes out there, which I plan to test out over time... but today I cheated and convenience won.

I LOVE pancakes... The whole maple syrup, bacon pancake combination is such a treat. (I'm sure I just lost some vegan readers). When I found this packet of buckwheat pancake premix I was super excited and NOT disappointed. 

Enter Orgran Buckwheat Pancake mix.

These guys make a huge GF, Vegan friendly range and today was my first time using their product.

 
They include directions for a vegan version!
 
 
The only ingredient I didn't recognise was the monocalcium phosphate (341). According to Steven Gates book on E numbers, it's a synthetic raising agent made from phosphoric acid treated with hydrated lime. It's not organic, i.e. not something cavemen ate, but it doesn't seem too scary to me.
 
I appreciate it also contains rice flour, tapioca starch and maize starch, but I figure 49% buckwheat flour is a pretty good start.
 
My pancake tips are as follows:
  • Don't forget when mixing, add the wet to dry to prevent lumps
  • I allow the pancake batter to sit at room temperature for at least 30 minutes. I'm not sure why, but it seems to make better pancakes.
  • The batter consistency should be slightly thicker than pouring cream, so add a little water or milk if its too thick.
  • Getting the fry pan the right temperature is the trickiest part. Generally speaking you want bubbles to form and burst on the uncooked side before the underside gets too brown. Flip to seal and get eating!
 
 
 I was a bit of a goose and I forgot to take a photo of the eggs and dairy, but you guys know what they look like...

Mix together the following
 
1 packet of Organ Buckwheat pancake mix
3 eggs
90 ml of dairy (I used rice milk)
240 ml water
pinch of cinnamon


Serve with your favourite toppings.

We had honey, mixed berries and mascarpone.